Showing posts with label making. Show all posts

Wednesday, 27 May 2015

In which I actually like something I've made...

I have a weakness for tailored jackets.  Properly tailored, not just off the rack at [insert name of high-street shop here].  Luckily, I've been known to sew clothes from time to time.  Unluckily, jackets are bastard hard to get right.  I've made several over the years, some of which have been absolutely terrible.

One of the more terrible attempts involved Vogue pattern 8679.  I made it to wear to my sister-in-law's wedding, wore it for that one occasion and then never touched it again.  That one was poorly fitted, because I sized it for my waist and failed to take it in at the bust.  The lapels were a mess, and it was badly rushed towards the end.  Rushed to the extent that I was still stitching the hems on the bus to the wedding.

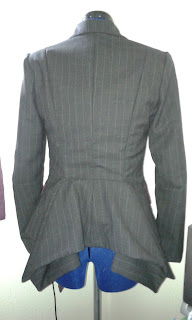
So, it didn't work out.  But I still loved the pattern, so I finally decided to have another crack at it.  Here's attempt number two:

I like this jacket because it's business in the front...

...and party at the back
It's much better fitted this time around (if I do say so myself), not least because this time I had Helena to assist.  I was able to take it in where I needed to without having to be wearing it at the same time, which really does make it easier.  The lapels, while not perfect, are also better than the previous attempt.

What I'm really proud of, though, and what doesn't really show in the pictures, are the pockets.  The actual pattern comes with pocket flaps, but no pockets, and that really irritates me.  It's bad enough when regular women's clothing comes with pretend pockets, but deliberately sewing it that way myself would be ridiculous.  So it was either leave the flaps off entirely, or go off-piste and make real pockets.  I chose the real pocket option.

It's only the second time I've made welt pockets.  The first was when helping out a friend with a jacket for some Eli Monpress cosplay.  That took the pressure off a little, partly because she'd reached the point of, "Just do it, I don't care if it gets ruined" (long story) and partly because, much as it's good for cosplay to look good, it only had to last for a single convention.  This jacket is intended for long-term use, so I wanted it to be right.

It was hair-raising, and it almost went wrong once or twice, but I managed to make actual, working pockets.  The marking for positioning the fake flaps made positioning the pocket welts easy.  I also elected to ignore the suggestion to make both sides of the flaps from the outer fabric, and actually made the undersides from the lining fabric.  It took a little bit of bulk out, and also gives a cheeky flash of purple when the flaps are raised.

So, yes, fully working jacket.  It's been test-driven in the office and garnered no comments whatsoever, which is a great result.  Nobody said, "What on earth are you wearing?"  That's a win.

Now on to the next jacket!

Monday, 2 February 2015

In which I dabble with cosplay

I've never been much of a cosplay person. Partly that may be because I can count the number of conventions I've been to on the fingers of one finger, but there are other reasons. A dislike of people looking at me. An aversion to spending money on something that can only be worn on specific occasions. An overwhelming fear of dressing up only to discover that nobody else has. I'm in awe of those who do cosplay and do it well, but I've never really seen it as something for me.

All of which is, of course, setup for writing about a recent brush with cosplay that I'm actually rather proud of. Many of the issues above didn't apply, because I wasn't the one wearing it. It was a costume for Small Girl, made at her request.

This last weekend, the National Space Centre in Leicester were having a special Doctor Who weekend, and on the Sunday the special guests in attendance were Sylvester McCoy and Sophie Aldred. Being the age that I am, I naturally consider them the finest Doctor and Companion ever to grace our screens, and so tickets were acquired to go and check out the event.

The website was encouraging people (and particularly children) to come dressed as their favourite character, and Small Girl does not share my fear of dressing up. Husband suggested that with her hair she should be Amy Pond, but she declared that she wanted to be Ace. That's my girl.

Step One was to acquire the base of the costume. We got lucky and found that Asda were selling 'leather' bomber jackets in their children's clothing section (even if they did shelve them in the 'boys' section). A skirt was easy enough to acquire, and she already had a t-shirt that would work. Bonus points for these all being items she can continue to get use from.

Step Two was to convert the jacket into something more Ace-like. The internet furnished me with a flat image of the logo from the back of the jacket that I could print and use as a template. I already had coloured felt to hand to make the pieces from. Rather than apply them directly to the jacket, I used some spare black cotton fabric as a backing. The felt was appliqued to the cotton using the sewing machine for a good strong finish, then I trimmed away the excess cotton and hand-stitched the pieces to the back of the jacket. That made it easier to position the logo correctly, and ensured the stitching didn't go right through the lining of the jacket. It also minimised the number of holes being made in the leather, keeping the jacket strong.

How does it look? Pretty Ace, actually...
Then it was on to the badges. There was no question of even attempting accuracy here. Achieving an accurate collection of badges involves a lot of time and expenditure, and getting certain ones custom-made. It was never going to happen when I only had two weeks and no desire to spend more money than strictly necessary. Instead I gathered up every badge and patch we already had in the house, plus a couple of extra patches picked up cheaply enough from craft shops. The finished jacket has NaNoWriMo merit badges, Shakespearean insults, Firefly and Monty Python references and some random bands all thrown together in a glorious mashup.

You want badges? She's got badges
So, was it worth it? You betcha. Not only because Small Girl loved it, though that was all I really needed from it. While we were at the exhibition, we attended a Q&A session with Sylvester and Sophie. Despite our sitting right over to one side, amongst a great crowd of people, Sophie spotted Small Girl's costume from the stage and came over specifically to talk to her and compliment the outfit. Seal of approval from Ace herself? Wicked! Hard work paid off in the best possible way, not least in the look on Small Girl's face afterwards.

Maybe I could get to like this cosplay malarkey after all...

Thursday, 11 September 2014

Time And Relative Dimension In Blanket

I'm... not exactly unambitious when it comes to my projects.  Or at least, once I get an idea in my head I won't talk myself out of it for flimsy reasons like the amount of work involved.  Like, say, crocheting 264 granny squares and assembling them into a blanket that looks like the TARDIS:

It's actually longer than the bed
As crochet practice goes, it's actually been quite a good method.  Plenty to focus on, it breaks down into manageable chunks, and the pattern for a granny square is extremely simple.  The repetition is excellent for getting the hang of crochet.  It took me an hour to make a single square at the start, but by the end it was more like twenty minutes.

Apart from those awkward two-tone ones at the edge of the information panel
The writing across the top is just chains, made to length and then stitched on top of the blanket.  Granny squares being full of holes, there's a limit to how small the writing can go.  Which is why I didn't make all the writing for the door - "Pull to Open" and all that.  I considered it, but it simply wasn't feasible.  The white panel breaks up the front, though, which is why I made it rather than just crocheting a different side of the TARDIS.

Yes, I took this picture just so I could make a 'P please, Bob' joke
This wound up being about six months of work from first conception to finished product, though there was a certain amount of getting distracted by other things along the way.  But I had it done just in time for the first episode of the new series, and now the whole family gets to snuggle under it while we watch.  That's really all I made it for, so I'm calling this a success.

Thursday, 14 August 2014

I Bought a Torso On the Internet

No arms, no head, and only a hint of legs. I call her Helena.

She even came in a box

Helena is going to be a big help with my dressmaking escapades, because she's roughly the same size as me. She has better posture and less in the way of unsightly bulges, but she should be good for preliminary fittings. It's incredibly difficult to accurately fit something on your own body, because every time you move your arm to pin a seam the whole garment shifts. If I fit it to Helena first I should only need to make minor adjustments to accommodate my own quirks. That's the theory, at least. I'll let you know how it works out.


She'll also be handy as a place to store projects without them getting creased. Her manual suggests I should also be using her to try out different accessories and colour combinations, but that's getting a bit too enthusiastic about the concept of wearing clothes for my liking. I find it much easier to only buy clothes in a couple of colours to begin with. That way, everything matches even when I get dressed in the dark.

Thursday, 20 March 2014

Out of Focus

I seem to have a lot of stuff on the go at the moment.  There's an enormous crochet project, which is probably going to take about three months and an awful lot of wool.  There's the novel to edit, of course, which currently stands at twenty thousand words of second draft.  There's Lavendar, who keeps poking me and insisting that I write more stories about what she did when she grew up.  There are all the other people who keep sending me stories and asking me for feedback (I love you all, guys, honestly!).  And of course there's work and family and the all-important Twitter to keep track of.  And, just occasionally, this blog.

I envy anyone with the focus to do one thing really well, rather than my usual trick of doing lots of things in a half-arsed, mediocre manner.  I have to have deadlines to get stuff done, and even then I can't devote too much time to something before my brain begins to itch and I need to do something else.  Writing every day in November is wonderful, but by the 1st of December I'm desperate to get back to other things.  There's simply no way I can sustain that kind of pace outside of November.  Not when there are things to crochet and giant squids to make and jackets to sew and...

Saturday, 8 March 2014

Make Do and Mend

Of all of the cardigans, jumpers and other assorted warm tops that I own, there is one that's a particular favourite.  Not that I don't like the others, but this one is particularly special.  It was bought a few years back, to mark my seventh wedding anniversary (that being wool), but that's not the reason why it's my favourite.  Not that it means nothing, but I'm pretty sure the jumper I bought for Husband on that occasion has long since bitten the dust, what with him being in possession of the World's Sharpest Elbows and all.

No, it's my favourite because it's comfortable, it's warm, and it looks damn good.  It's not the workaday black rollneck, nor is it the huge, snuggly, not-terribly-smart cardie.  It occupies that hallowed territory right at the centre of the Venn diagram, meaning that I'm extremely reluctant to ever part with it.

This, naturally, became something of an issue.  My elbows may not be quite as sharp as Husband's, but I do still have a terrible tendency to lean on them when sitting at my desk, and that takes its toll on knitwear.  The sleeves of the cardigan developed increasingly threadbare patches, until I could no longer wear it in good conscience, certainly not anywhere that required a reasonable standard of dress.  Was this to be the end for Favourite Cardigan?

No.  Of course it wasn't.

Darning isn't something that comes up much these days.  Modern socks are both cheap and fairly flimsy, so nobody really bothers trying to mend them when they develop holes.  It's not something I'd ever tried myself, but the need to rescue Favourite Cardigan spurred me into action.  Fortunately, although it may not be as widely practised as it used to be, there are plenty of websites out there that will give you an introduction in how to darn.  And it's actually remarkably simple.  Some thin mending wool.  A cardigan with a threadbare patch.  Something to stretch it over (I bought a cheap wooden mushroom from my local Large Craft Chain).  And then it's basically just weaving.  A row of threads going one way, weaving in and out of the existing wool.  A row going the other way, weaving in and out of both the regular wool and the mending wool.  Easy as pie.

The work is all done on the inside of the garment, because it ends up looking like this:
 
Darn it!

Part of the reason for the ugliness is that you leave a loop at the end of the line every time you turn around, to give a little space for stretching.  That's why the edges of the patch look so fuzzy.  Fortunately, when you turn it the right way out it looks like this:

Flawless Victory!

I followed some advice that suggested making the second set of rows (the weft, if you will) diagonal rather than perpendicular, which again allows for a little more stretch.  It's also best to catch the problem before it turns into a full-blown hole if you can, because the darning is a lot easier (and will be stronger) if there are still threads left behind to work in and out of.  Although I'm told that if a large hole has developed you can cover it with mesh before you start, to give something to work with.

I'm immensely pleased that it worked and I can continue to wear Favourite Cardigan for a while longer.  I still don't plan to start darning my socks any time soon, but there's a chance that if I can keep an eye on Husband's elbows he won't have to spend quite so much of my hard-earned money on knitwear...

Wednesday, 26 February 2014

I Seem to Have a Reputation for Liking Tentacles...

Honestly, you write one sex scene involving multiple tentacles and suddenly you're branded as a weird fetishist for the rest of your life...

Still, in the 'continuing to not help my cause' vein, allow me to introduce you to Insatiable Glor:

With Bonus Cameo from Previously-Featured Cushions!
(The name is a long story, involving accidental typos and the willingness of a small group of writers to transform almost anything into a deity they can pretend to worship.)

Yes, Insatiable Glor-as-pictured is an eight-foot-long cuddly squid.  What of it?  I got both the idea and the instructions for making him from Build-a-DIY.  The link was sent to me by Husband, who assures me that he did realise I would be immediately seized by a need to make one, and much encouragement in the endeavour was supplied by Giant-Plushie-Loving-Friend, who mostly just wanted me to be the guinea pig before she makes one of her own.

Step one was of course to make up the pattern.  Discussion with Giant-Plushie-Loving-Friend (henceforth GPLF) of ways to transfer the image on the site to a large-enough piece of paper took in everything from projectors to pinhole cameras to pantographs (apparently, it needed to be something beginning with P), but in the end I settled for a good old-fashioned pen-and-ruler approach.  The living room floor was covered with greaseproof paper and I spent a happy evening measuring, marking, and freehanding curves until I was satisfied with the end result:


Next step, acquiring the materials!  GPLF was snared into agreeing to drive me to the craft and fabric shops (my car is currently out of action until the clutch gets seen to) and giving me a second opinion on things.  Polyester stuffing and beanbag beans for filling Glor were easily acquired, but the fabric was a slightly tougher proposition.  The fabric shop came up trumps with a lovely mottled green that was a perfect squid colour, but was entirely lacking in suitable spotted-prints for the sucker side of the tentacles.  I was on the verge of settling for something that would *just about* work when GPLF spotted, in the clearance bin, a perfectly-sized offcut of a far better sucker fabric than I would ever have imagined existed.  Clearly intended for upholstery or curtains, it has textured circles that make perfect squid suckers.

While all of this was going on, Husband and Small Girl were away for a few days visiting family over half term.  By the time they got home, the living room was full of tentacles:

See what I mean about the fabric?
The pattern is mostly easy to assemble, which is always nice.  Turning the tentacles was a little tricky, but turning a narrow tube of fabric always is.  Otherwise, the only difficult thing was manhandling something of that size, with that much padding, under the sewing machine.  There were tentacles everywhere!

The tentacles and fins were stuffed with polyester stuffing, but getting enough stuffing for the body would have cost an absolute fortune, so instead I went for beanbag beans.  I also went a little off-piste as far as the instructions were concerned, and sewed the final piece on before stuffing the body (leaving a hole both to turn the squid the right way out and to insert beans).  Then I got busy with a jug and a funnel:

This was remarkably soothing to watch...
It didn't take me long to dispense with the funnel, since it kept getting clogged and the hole in the squid was large enough to pour the beans in directly.  I also wound up drafting in Husband as an extra pair of hands, to hold the squid at a suitable height so the body could fill up properly.  A bit of leftover stuffing went on the top, to help prevent the beans falling out while I sewed it close.  All stitched up, it was on with the eyes and Insatiable Glor was complete.

No, I don't have any idea where I'm going to put him.  No, I don't care.

Saturday, 15 February 2014

Everything is Awesome!!!

Everything is cool when you're part of a team!  And if you don't agree, I can only assume that you haven't seen the Lego Movie yet.  You really should, by the way.

I'm not going to spoil it here.  Instead, I'm going to take advantage of the uncharacteristically upbeat mood I've been left in, and talk about some other things that are awesome.

1).  COBOL is Awesome!

I have four weeks left of my probation period at the COBOL factory, and the current expectation is that I'll pass with flying colours.  In the past five months I've picked up COBOL and JCL with reasonable facility, and I'm finding coding to be remarkably fun.  I haven't enjoyed a job this much in a long time.

2).  Editing is Awesome!

In the past week I've put together over 5,000 words of the second draft of the novel.  That's nowhere near the sort of pace at which I crank out words during November, of course, but it's pretty good for keeping regular life ticking over at the same time.  There will doubtless be further blogging about the process at some point.

3).  Making Stuff is Awesome!

I've already blogged about the cushions I made recently.  No doubt there'll be more in future, since I have crochet on the go and plans for several cool jackets (I'm weirdly obsessed with the idea of making jackets.  Not sure why, but jackets are awesome).  The fireplace in my living room is decorated with crocheted amigurumi and a tiny robot panda made of felt, and I recently rediscovered the pencil tidy I made from clothes pegs in my youth and redeployed it so I won't have to spend quite so much time looking for a pen to do the crossword at the weekend.

4).  This Thing is Awesome!

Look at it.  It's beautiful.

I came across this in a shop window in Kyoto a few years ago, and it's one of the most awesomely steampunk things I've ever seen in real life.  It's an automated machine for making tiny cakes of some description.  Metal rings come down a chute at the back and are positioned on the inner ring of the hot plate.  Batter is squirted in, then they make a full rotation to cook one side before being flipped over onto the outer ring to cook the other side.  After that second rotation they're taken off the hot plate and are ready to go.  The photo doesn't entirely do it justice, because it was absolutely mesmerising to watch.

5).  Lego is Awesome! (Obviously)

Do I really need to say anything here?  I think I'll let this be my final word on the subject:


Monday, 10 February 2014

Cushiony Goodness

For many years there has been, in our house, a cushion with a picture of an elephant hand-embroidered on it whose exact provenance is unknown to me.  Recently, not least as a result of living in the bedroom of a small girl, this is what it looked like:

Yes, that's green felt tip you can see on the cushion itself

Small Girl was, needless to say, somewhat upset by its current state, so I agreed to see what I could do to rescue it.  Electing to focus on salvaging the elephant itself and not worry about the border, I first attacked the cushion cover with scissors.  There were a few small holes in the fabric within the boundaries of the elephant, so I strengthened them with mending tape before putting a layer of interfacing across the whole of the back:

There's felt tip on here too, but it's not so easy to see
The tail, sadly, got a little caught by the fray monster but the rest was rescued reasonably intact.  The next step was to see about transferring it to a new cushion cover.  I gave Small Girl the choice between having something in a matching colour or going for a contrast; she elected for the contrast and requested her favourite colour (blue).  Blue fabric was duly procured and cut to size, and I applied a further layer of interfacing to the reverse of the piece earmarked for the elephant (better safe than sorry).  The elephant was pinned in place, then sewn on using a very short zigzag stitch to cover the edges.  It'll never be the strongest of pieces, but fingers crossed it'll last a while longer now.

Once the elephant was attached, it was a simple enough matter to run round the sides and put in a zip.  Hey presto!  One finished cushion:

I thought I was going to catch the edges of the elephant more than I did

That's not the only cushion I've made recently, either.  For Christmas I got a cross-stitch kit for embroidering a cushion cover in a rather striking design.  Hand-stitching that took the best part of a month, then while I was out buying blue fabric for the elephant I also picked up some different fabric to make the cross-stitich cushion cover, plus a second one so the sofa won't overbalance:

Avast, ye LuBBers!

The skull-and-crossbones cushion is the same yellow on the other side, so when civilised guests come around we can have a smart matching pair on display.  With less civilised company, or if we see a fat Spanish sofa weighted down with gold doubloons, we can hoist our true colours and attack.  These were, again, simple enough to make although stitching through all that canvas and wool took some effort.

Now, if someone could just explain to me: what are they for?!